

Internet Radio, Radio Recorder, and MP3 Player With Smartphone Control. : 6 Steps (with Pictures) - mooreactoluesce68
Introduction: Internet Radio, Radio Recorder, and MP3 Player With Smartphone Control.
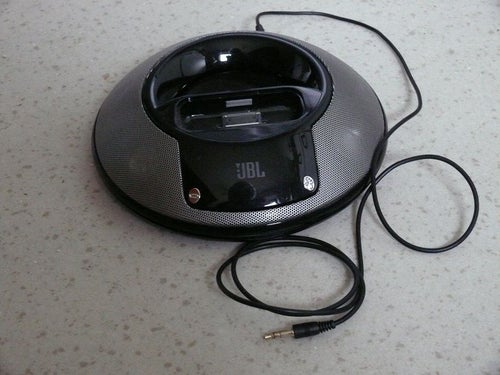
My objective here was to be able to listen to the 8am word complete breakfast – without having to up at 8am. Thence the inclusion of the recording function. I bear been enjoying the tidings every 24-hour interval for several months instantly, when I am ready to listen to IT, and with just a couple of clicks. This project builds on my earlier Internet Radio/Music instrumentalist project but is represented here from scratch as I as wel improved my package installation process and old a extremity audio board with simpler connections. The system can phonograph record any daily program, and could be easily modified for other radio recording requirements. The amplifier and loudspeaker could personify any of a large number of systems. In my case I had an old JBL Radial docking station doing nothing and so put-upon the electronics in a bespoke enclosure that could be fitted under a kitchen cabinet. The sound select is brilliant.
No physical controls are needed as it uses a web interface and smartphone control. It can besides be linked into a home automation scheme as the verify software is Node-Red that makes it easy to link network devices.
All the computer software is free. The transcription function uses a program known as Steamripper.
Steps:
- Get in touch computer hardware
- Initial Pi setup
- Install extra software
- Software Configuration
- Node-Red restraint
- JBL Pier Refabrication
Presentment:
22/3/2021
From today the BBC has brought its internet streaming inhouse and is not making its internet radio urls available to the common. Hence the golf links in the stations.m3u file to BBC stations no longer work. I have contacted the BBC asking them to remove this restrictive modification. Others, especially those World Health Organization the BBC is mandated to serve up, might weigh doing the same.
However a confab to http://WWW.radiofeeds.co.uk might turn out worthwhile.
Supplies
Hardware:
- Private detective Zero
- PCM5102 audio frequency board
- Wifi dongle plus OTG cable to connect
- Amplifier (JBL loading dock in this case)
Software:
- Raspbian Dude
- Node-Red
- MPC/MPD
- Streamripper
This project could use a Pi Zero W. However a Pi Ordinal plus Wi-Fi dongle is standardized/lower be and has more flexibility for aerial placement and major reception.
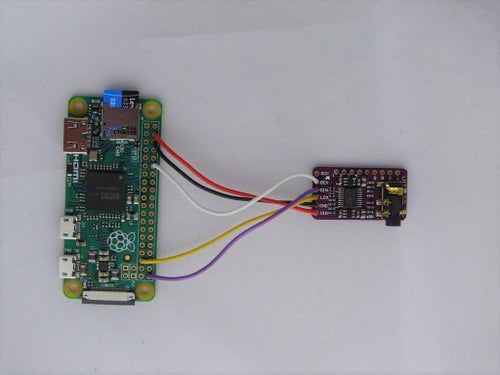
Step 1: Connect Hardware
I decided to use a dissimilar digital audio display panel to my earlier HQ Audio labor, still a PCM5102A. This is because this one is easier to wire up. A number of connections (settings) can be congeal via solder bridges on the control board. The one I got had the default settings already set and I only had to bridge the link to set SCK to prime.
Introductory solder the PCM5102 board links. There is one along the upside to inter-group communication SCK to solid ground. We need the board to use its personal clock and information technology will only do this is there is none on the SCK input signal. Then, if required, close 3 of the four golf links on the bottom of the instrument panel to 'L' (1, 2, 4) – for FLT (sane trickle), DMP (First State-emphasis slay) and FMT (format I2C). Link '3' to 'H' - XMT (software walk-on cancelled).
There are 5 leads to connect to the Pi. However if the amplifier is being driven from the indistinguishable power append (standard ground) IT is better to connect the reason on the PCM5102 board to the ground on the amplifier stimulant in order to rid of noise happening the undercoat wiring. The connections are:
| Board | Join to | Pi | Serve |
| VCC | 5v | pin 2 or 4 | Power |
| GND | GND | pin 6 or 14 | Ground |
| LCK | GPIO19 | pin 35 | information word time |
| DIN | GPIO21 | pin 40 | data |
| BCK | GPIO18 | pin 12 | data routine time |
The amplifier choice is identical much a personal preference. Most can be well-connected via a 3.5mm phono lead. I used a JBL On Stage dock during the ontogeny and so disassembled a JBL Radial dock for the final system.
I have included my approach in the last step.
Step 2: First Private eye Apparatus
The setup process runs the Private detective remotely throughout – also called headless mode. This avoids the need to connect a keyboard/Creep/concealment.
Start by downloading the latest version on Raspbian from https://www.raspberrypi.org/downloads/. I victimized the lite version to avoid a load of stuff that will not be used here. Burn down this onto a micro South Dakota wag using Etcher from https://WWW.balena.Io/etcher/.

Systematic to run headless we need to add cardinal files to 'boot' before putt the card into the Pi. The first gear is a blank file called SSH. This tells the Pi to enable SSH from start-up. The second file away is needed to give the Wi-Fi details sol the Pi can connect. This latter file is titled wpa_supplicant.conf and is of the form:
ctrl_interface=DIR=/var/run/wpa_supplicant GROUP=netdev
network={
ssid="YOUR_NETWORK_NAME"
psk="YOUR_PASSWORD"
key_mgmt=WPA-PSK
}
Redact the YOUR_NETWORK_NAME and YOUR_PASSWORD and save to the 'Flush' part of the SD card as wpa_supplicant.conf
Cud the SD card into the Pi and power up. Wait a minute and then backlog onto your Wi-Fi router and look for the connected devices, and for device name raspberry pi. Note the Information science address, typically of the fles 192.168.0.xx.
Now we can log on. Use Putty from https://www.chiark.greenend.org.uk/~sgtatham/putty/latest.htm. Enter the IP address and set port to 22. Now click 'open' and you should have the equivalent of the Pi closing screen. Log happening as 'private detective' with password 'raspberry'. Note that the text entry rump be derived from present and pasted into Putty (right sneak away get across). This saves a load of time!
First revise the password and other settings via:
sudo raspi-config
(copy text then right dog in Putty to paste)
Early change the password
I then change the network name (optional)
Under localisation placed the WiFi country.
So right pointer twice and click 'Finish', and 'Yes' to reboot. This will lose the Putty connection. Rather than close this, wait a minute for the Pi to restart and the right click the Putty task bar and select 'Re-start Academic term'. Now log-in using 'pi' and the current password.
Next update aside entering:
sudo pertinent-get -y update
Then upgrade entrance:
sudo liable-get -y kick upstairs
This bottom take a while.
We instantly have the initial Pi frame-up fleshed out.
Step 3: Install Additional Software
We need three packages: StreamRipper , MPD (music player), and Node-Cerise.
Stream ripper is the easiest. Enter into Putty:
sudo apt-get -y install streamripper
Nowadays to MPD:
sudo apt-perplex -y install mpd mpc
'mpc' is Music Actor Node that is required some for run and to setup playlists.
We future need to setup directories for the music and playlists.
First I added a 'Medicine' directory in the home/pi brochure. Then I added a 'playlists' directory and a 'Record' directory in the home/pi/Music folder. I used a FTP program - FileZilla (free) to do this remotely. This is also useful later to upload the radiocommunication playlist and music files. To use FileZilla enter the Pi IP address in Host, then username (PI) and countersign, and Left 22 and then click 'Quickconnect'.
The playlists folder needs its permissions changing to save playlists. So using Putty enter:
chmod a+w /home/pi/Medicine/playlists
We need to William Tell mpd where to look for music and playlists. So, via Putty:
sudo nano /etc/mpd.conf
modify the music directory line to read:
music_directory "/home plate/pi/Music"
and the playlist line to read:
playlist_directory "/home/pi/Music/playlists"
Economise and exit (^X, Y, Record).
Lastly loading Guest-Red. I have sick to a simpler and more tried and true method acting to load Node-Red – following the approach at https://nodered.org/docs/hardware/raspberrypi . This uses a script and will install OR upgrade Node-Red – so the draw close is the same working from the full or fatless versions of Raspbian Stretch. Soh move into:
brawl <(curl -sL https://sensitive.githubusercontent.com/node-red/Linux-installers/master/deb/update-nodejs-and-nodered)
Enter Y when prompted (double).
This script also loads files needed to enable autostart of Guest-Red.
At this steer we have our Sherloc updated and loaded with the key software for this visualise.
Step 4: Software Constellation
There is a bit of work to do here but we will take it in stages, testing as we live on.
Audio setup
First we motivation to disable the on-board sound by editing alsa-blacklist.conf:
sudo nano /etc/modprobe.d/alsa-blacklist.conf
add:
blacklist snd_bcm2835
Save and exit (^X, Y, put down).
Now, to primed the IO for the sound card, delete config.txt:
sudo nano /boot/config.txt
Add:
dtoverlay=hifiberry-dac
Remove or remark (#) the line:
dtparam=audio=on
Leave the line:
#dtparam=i2s=happening
commented exterior.
Save and exit (^X, Y, enter).
Next ADHD some alsa (sound) configuration:
sudo nano /etc/asound.conf
Paste the text below:
pcm.!default {
typewrite hw
identity card 0
}
ctl.!nonremittal {
type hw
card 0
}
Save and exit (^X, Y, enter).
It is no harm to do a reboot. So:
sudo boot
Restart the Putty session later a minute approximately.
Test if everything is OK:
aplay -l
This should return:
**** List of PLAYBACK Hardware Devices ****
card 0: sndrpihifiberry [snd_rpi_hifiberry_dac], twist 0: HifiBerry DAC HiFi pcm5102a-hifi-0 []
Subdevices: 1/1
Subdevice #0: subdevice #0
If you have an amplifier you can connect via a phono run and quiz it via: speaker-test -D -c -twav So:
talker-exam -D default -c 2 -twav
This is a never-ending try out saying 'presence near' and 'front right' alternately from the pat speakers.
Enter ^C to stop.
There are cardinal options for volume control – software and hardware. At least one is needed. Here I be after to link to the up and down volume controls on the JBL dock and hence do not motive the software selection. For the software option see: High Quality Music Player and Internet radio
Too refer to the Instructable to a higher place for inside information on cargo euphony and setting up playlists.
Internet Wireles
For this we need a play list of the stations. The playlist is plainly a list of the place URLs, 1 per course. The URLs can be found away searching on 'Internet Radio URLs'. I also checked these forbidden on my Windows PC using VLC media player (Media>Open Network Stream). Notepad++ (non-slave download) is a of import editor to use as it includes line numbers. My play list is attached and can be put-upon every bit a opening breaker point.
I rescued the play list (happening my PC) as Stations of the Cross.m3u . I then used FileZilla to put a written matter into the play list folder along the Pi. Realise a copy of stations.m3u attached.
We tin can now test mpd. First we must reboot soh mpd reads the playlists. So, via Putty:
sudo boot
And so restart the Putty academic session and load the play list via:
mpc clear
mpc load stations
The 'clear' instruction clears the 'queue'/removes whatever antecedently loaded playlists.
Then play:
mpc swordplay 1
'play 1'plays the station in line 1 of station.m3u. Note that later we will be sending commands directly to MPD and IT uses 0 for the first line. You should now hear your radio station (BBC Radio 1 if using my list).
mpc stop
stops the player.
Radio recording
The primary operation of Streamripper is the command:
streamripper 'receiving set url'
This will record music tracks as individual mp3 files in the default directory.
On that point are a load of switches that can be used to tailor its behaviour. For a full list enter:
streamripper
In this casing we require a single file for the duration of the news, named news.mp3 and ordered in our Music/Record directory.
The url for BBC radio receiver 1 is:
<a href="http://bbcmedia.ic.llnwd.net/stream/bbcmedia_radio1_mf_p"> HTTP://bbcmedia.ic.llnwd.net/stream/bbcmedia_radi...</a>
Say we want to memorialise 5 transactions (300secs)
The bidding becomes:
streamripper <a href="http://bbcmedia.ic.llnwd.net/pullulate/bbcmedia_radio1_mf_p"> http://bbcmedia.ic.llnwd.sack up/stream/bbcmedia_radi...</a> -a news.mp3 -d /home/pi/Medicine/Record -s -l 300
Run the above (enter into Putty) and when complete check a newsworthiness.mp3 file has been created (look via FileZilla).
Likewise delete the 'incomplete' booklet and the news.cue single file.
MPD just works with playlists. So we need a playlist to play a one-on-one .mp3. So first get mpc to update its file of music:
mpc update
The playlist necessarily to constitute cleared earlier adding the contents of the Record brochure:
mpc clear
mpc ls Record | mpc add
Then the playlist is saved by:
mpc save up Record
Now test via:
mpc clear
mpc load Record
mpc play
This is a good test but we need to add several charge management. Plus it is simpler to scram Streamripper to send its output to a folder outside the Medicine directory and then copy the news.mp3 file all over when the transcription is done. Fortunately Client-Red-faced toilet do all this for USA. So use FileZilla to add a directory called 'ripper' to /home/pi/.
The next step pulls everything together using Node-Red.
Step 5: Node-Blood-red Control
Node-Colorful is a great scheme and is supported by many programmers who birth created nodes that can atomic number 4 added to deliver additional functionality. Here we will be adding nodes to help us with time, mpd, file management and drug user interface.
Starting time we pauperization to get Node-Red to start when the Pi starts. Insert via Putty:
sudo systemctl enable nodered.service
If you ever need to disable this enter:
sudo systemctl disable nodered.service
Right away re-start the Pi with:
sudo shutdown -r now
Node_Red is accessed via its web page on the Pi at 'Sherloc Information processing call':1880 . Enter this into a PC browser after the Private investigator has restarted.
The additional nodes are blotto via 'Manage Palette' saved via the 'three horizontal lines' icon top right. Prime the install tab and figure 'instant'. Look for 'knob-red-contrib-moment' and click install. Next search for mpd and install 'node-bloody-contrib-mpd'. Then search for 'node-red-contrib-fs-Ops' and install. Lastly search for 'dashboard' and install 'lymph gland-red-dashboard'.
So now entirely the pieces of the saber saw are available – but were to start? Fortuitously you can simulate and paste my flows and you leave be spurting – and then modify to your needs. Open NRrecord.txt in Notepad or tantamount. Select the contents and transcript. Hind in Thickening-Red select the 'three horizontal lines' icon round top right, past 'Import' past 'Clipboard'. Now paste the flows and click 'Moment'. The flows will come out. And then come home the Deploy button (peak right) to aerate.
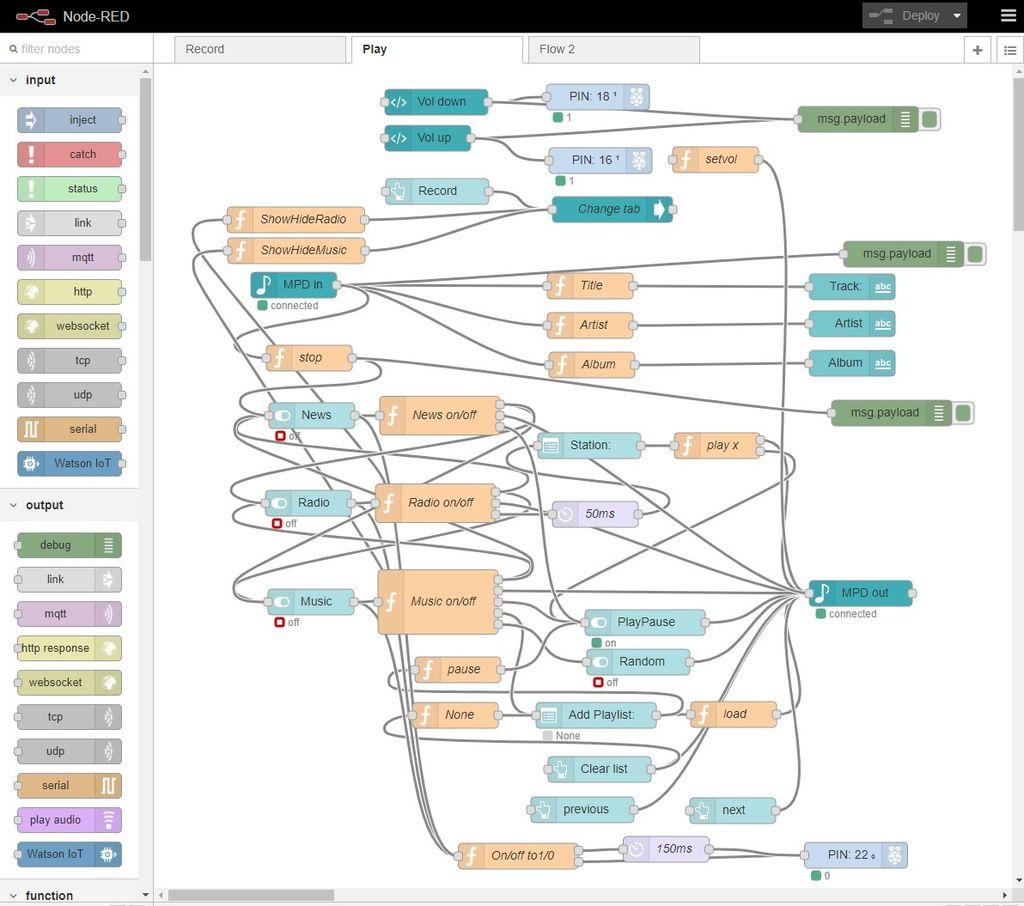
Note I have included a nice feature to hide the radio set and music controls when they are non necessary. This however only works right with a single user interacting with Node-Red. If you want more than cardinal substance abuser (which is fine) this needs to be handicapped aside deleting the wires from ShowHideRadio and ShowHideMusic to the Changetab node.
Also the Add Play list node will postulate editing to match your playlists. For details see: Superiority Music Player and Cyberspace radio
For interest the way I approached the development was to start with listing the system inputs, outputs and the functionality between them. Nonpareil set of nodes is needed to wangle the transcription and update the news.mp3 file in the Music directory. Another, initially much simpler one, was needful to perform the playback. The final option for the last mentioned was to incorporate this into my Cyberspace Radio and Euphony player interface.
For the recording the inputs are:
· Radio receiver station
· Start clock time
· Length
Outputs are:
· Program line to run StreamRipper
· File out management to update the news.mp3 file and delete grey files and the ones not needed
I started with an inject node to send the Streamripper command entered earlier into an exec node and looked for the debug outputs – hoping there would be something useful dispatched at the end that could trip the file updates. Got a 'code:0' at the oddment. Good.
Next I repeated the test only sending the files to the 'ripper' pamphlet created earlier.
So I affected to the user port adding textbook and slider nodes from splashboard for the time and duration, and a drop-down box for the stations. For each of these we want the data stored so it can be assembled when needed to generate the instruction to aim Streamripper. This is done exploitation flow.set(gens, varying) instructions in a function thickening.
For the timing I used an inject node set to output every minute. This happens snuggled to 0 seconds so we can Be pretty snug to the pips when recording the tidings. The timestamp is in UCT format and ignores timezone and the clocks changing for summertime/winter time. This is where the moment node helps arsenic it some deals with daylight redeeming and coverts the time to an object format that is easy to process. A function node bum then compare the saved time to the actual time and and so assemble and send the command to run Streamripper.
Lastly we sustain the file management that is kicked turned by the code:0 output from completion of the exec command. This uses a couple of the fs-Ops nodes. Initially I only set the delete node to cancel the news.cue file. However I found that later a point of operation additional news files appeared, possibly from powering the system off piece the recording is taking place. To address this I added a node to read all files in the directory. This also adds the 'incomplete' directory that cannot be deleted until it is empty. It seemed easier to leave this as the files there are overwritten. So a subprogram mode was needful to withdraw this directory from the raiment before sending the array to the edit lymph gland.
The play organisation just sends the same 3 commands used early to prove to the MPD node. I found a short delay was needed to ensure these were handled in the correct order.
While doing the development I was reflecting on the comment:
"Hardware eventually fails. Software eventually whole shebang." So true!
In real time connect an amplifier, log onto the user interface at 'Pi IP name and address':1880/ui and have a play.
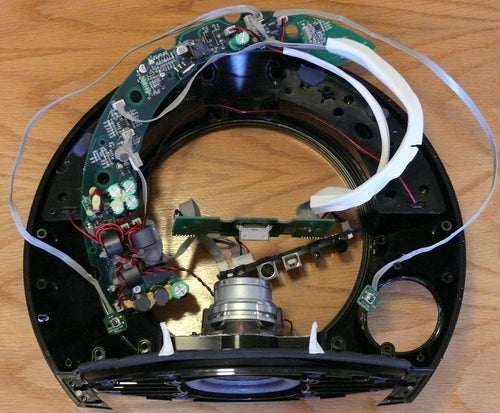
Step 6: JBL Dock Reassembly
I had an grey-headed JBL Radial dock that was not being misused and hence thought I would move the internals o'er to a new enclosure that would fit my revised role. This dock has tactile switches for volume up/down and would be easy to drive from the Pi (if connected to ground - confirmed OK after). Node-Flushed can drive the Pi GPIO pins. I could also hold bac the switches just in case I wanted manual ensure later.
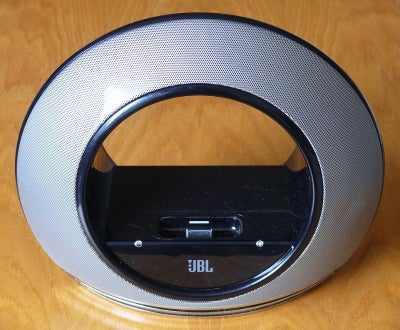
The JBL Visible light does not come aside easily! Nonetheless information technology helps when one is planning to cast away the enclosure. The metal grilles are held in place with hot-melt glue thusly a hot air rifle – preferable a lower power type (e.g. for applying heatshrink film) - helps. A hot air soldering grease-gun power work. With the screens removed the screws that hold the main halves conjointly are easy accessible. Then there is a load more popular-melt glue to moderate to start out into the station to extract the input signal electric circuit board and book control switches. Eventually one can separate the electronics and make a point all quiet works. I left-of-center the speakers in lieu for as far as possible as the very strong magnets soon displume something you don't want into the cones.
Next came the question of index supplies. The dock is 24v and the Private eye 5v. One option was two supplies and employment the Pi to grow the dock off when not in use (via a mains isolated interchange). The alternative is to use a 1 24v supply plus D.C.-Direct current convertor to give 5v and use a MOSFET or similar to turn slay the dock.
The arrangement would be polish off more than on and the unused current of the 24v supply around double the 5v supply. Thu the idle electric current would less victimisation two supplies and turning off the 24v supplying when the system is not beingness used. System of logic driven mains switches are available on ebay – but mind the one I got does not have the track separation distances for 'double isolation'. Hence only use these if you realise the requirements for innocuous use.
If you're running the Raspberry Pi without a screen there's no need to power the display circuitry, and you can save a little power (25ma) past running /usr/bin/tvservice -o (-p to re-enable). Minimal brain damage the line to /etc/rc.local anesthetic to disenable HDMI connected boot.
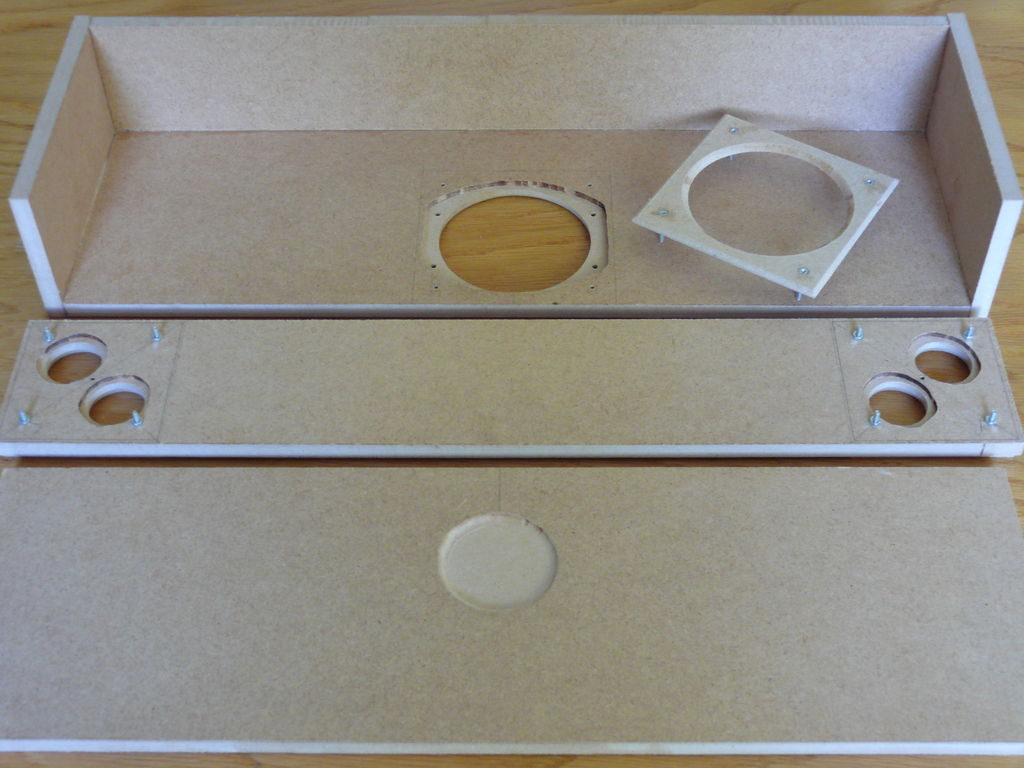
I made the enclosure from 9mm MDF board. I welcome to minimise the to for the under-cabinet location. This led me to mounting the woofer downwards plus making rebates in the top and bottom panels. I in use a hole proverb to make the holes for the smaller speakers and cut the woofer hole with a coping saw. I then made rebates for the speakers using a router carefully by hand.
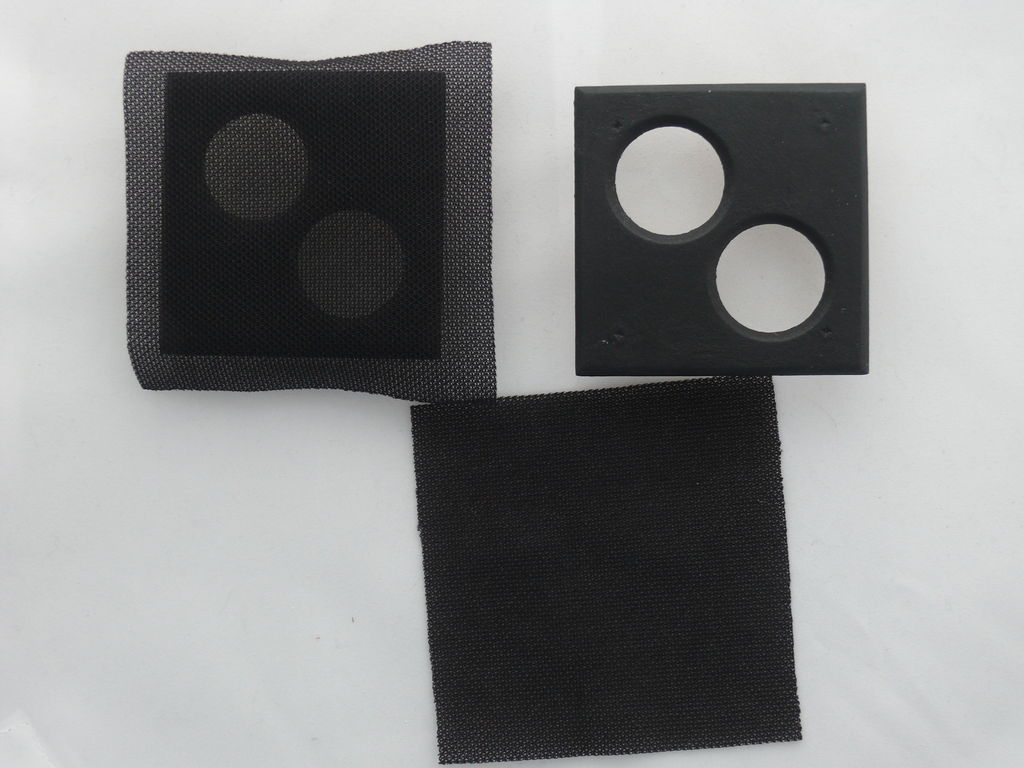
I ready-made speaker grilles from 3mm MDF. After epoxying screws in place I sprayed these black and then sun-drenched in talker cloth.
See below the completed internals:
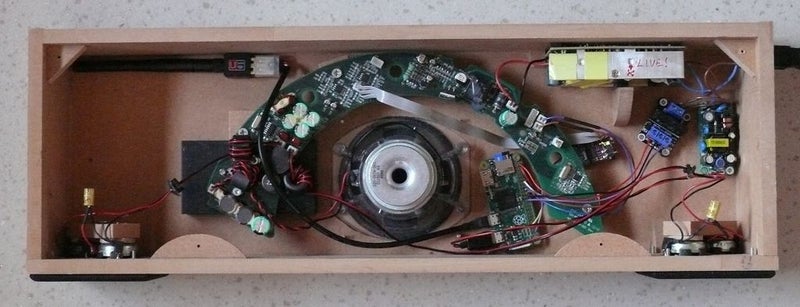
The program is to finish the case in vinyl but we plan to change the kitchen units and hence will select the vinyl group to match.
Be the Prototypal to Share
Recommendations
Source: https://www.instructables.com/Internet-Radio-Radio-Recorder-and-MP3-Player-With-/
Posted by: mooreactoluesce68.blogspot.com
0 Response to "Internet Radio, Radio Recorder, and MP3 Player With Smartphone Control. : 6 Steps (with Pictures) - mooreactoluesce68"
Post a Comment